


These are the ingredients you'll need to style a coffee table like a designer.
Tray: A tray establishes order and is the foundation for a chic coffee table. It is the perfect base for a vignette of decorative accessories and fresh flowers. Whatever is placed on the tray will look neat and polished. Adding a tray to a larger coffee table is helpful in breaking up the space.
Flowers: Fresh flowers are always a good idea and an inviting touch when entertaining. A simple monochromatic arrangement in a plain square or cylinder glass vase is timeless.
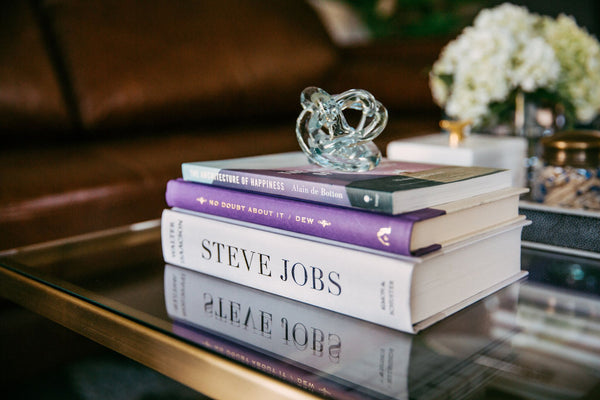
Coffee Table Books: Make stacks with hardcover books that reflect your interests. You can remove the dust jackets of books you may already own to reveal colorful covers. If you're wanting to pick up a few new books to add to your collection, look for bight covers and bold lettering.
Decorative Boxes: Decorative boxes are great for storing small items such as matches, keys or remotes.
Candle: Scented candles are a great addition to a stack of books and when lit, add a magical element.
Paperweight or Decorative Objects: Like a candle, paperweights and other decorative objects are great for topping off a stack of books.
Petite Trays: Small trays are perfect for corralling small items, like old keys, coins or polaroids.
Matches: Storing matches in a small glass canister or bowl is ideal when there's a candle close by and adds a pop of color.
Mementos: Coffee tables are a great place to share a bit of your personality. Considering doing so by displaying a favorite collection of coins or polaroids.
Magnifying Glass: A magnifying glass is another item I love to use to top off a stack of books.
Step 1: Decide where you'd like to place the tray. I opted for the center of the coffee table, but I also love to place it either on the right or left side.
Step 2: Create a vignette on the tray with a vase of fresh flowers, a decorative box, a petite tray and a canister of matches.

Step 3: Arrange stacks of hardcover books on either side of the tray, or to one side of it, depending on where you placed your tray. If your coffee table has a shelf, make sure to place stacks of books here as well.
Step 4: Top off the stacks of books with a candle, a paperweight or decorative object, a decorative box or a magnifying glass. Books and trays are horizontal so adding something on top add height and visual interest.
Step 5: Add the details. I used a petite tray to display the skeleton keys I picked up at El Rastro flea market in Madrid in the summer of 2007. I also used a small wooden dish to display some coins from my travels and old photographs I bought in upstate New York on a trip with my maternal grandmother a couple years ago.

Books and decorative accessories on a coffee table are a great way to add a pop of color to a living room. These items can easily be switched out depending on the season. Still overwhelmed? Just remember these three tips, stack it, top it, corral it.
You can shop all my accessorizing pieces by visiting the links below.
Styling: Martha Hatfield
Photography: Aubrie Cornelius
Comment
Here’s a recipe I found (and mdiifoed slightly). I’ve been GF for a year, and am still learning. Baking with GF flours is always an experiment, and it certainly helps to keep xanthan gum on hand (helps mimic gluten in some things, and reduce the unavoidable crumbliness of it all).3c Gluten Free Flour (I use Bette Hagman’s recipe for Gluten Free Mix)4 tsp Dried Yeast1/2 tsp sugar1 tsp salt1 1/2 tbsp canola or olive oil1 egg (this I added as the dough was very crumbly otherwise you might want to try 1-2tsp of xanthan gum if you have it)Combine yeast, sugar and 3 tablespoons of warm water in a small bowl and set aside until foaming. Sift the flour and slat into a large bowl. In a separate bowl mix together 1c warm water and the oil, then pour into a well in the dry ingredients along with yeast mixture. Mix together with wooden spoon until all combined. [This is where we realized it needed a little more fluid, so we added a splash of water and an egg].Turn dough out onto lightly floured surface and knead until smooth. Cover and set aside in a warm place for about 1hr, until doubled in size.Punch down dough, knead lightly. Divide dough into 2 portions, and form onto 2 10 3/4inch pizza trays.Add toppings and all that yummy stuff. Bake at 425F for approximately 20min.The crust came out thin (which we really enjoyed) it wasn’t your traditional pizza dough consistency, though the xanthan gum may help add a little chewiness to it.Hope this works out for you!